ARCH FIBERGLASS CORP.
" C O N C E R N E D C R A F T S M A N S H I P "
[HOME] - [CONTACT INFO] - [PRODUCTS & SERVICES] - [ARTICLES & INFO] - [OUR WORK] - [DOWNLOAD CATALOG]
|
| ||
Specifying & Installing Architectural FRP Architectural FRP - properly manufactured and installed - is proving to be a major asset in building renovation and restoration.
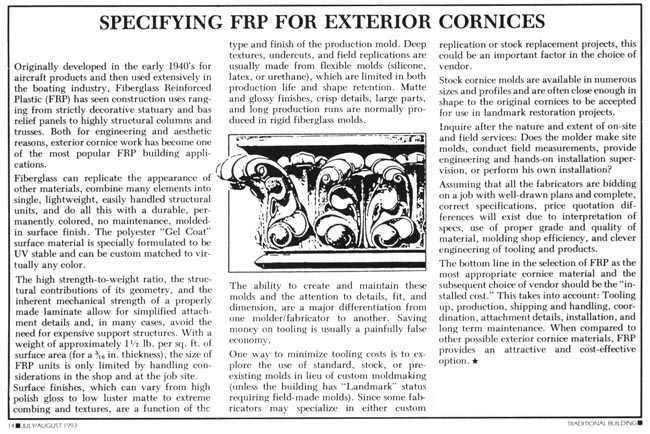
Fiberglass Reinforced Plastic (FRP) is a versatile construction material that, utilized correctly, provides attractive, durable, and cost-effective solutions to a wide range of exterior building restoration problems. Decorative use of FRP commonly includes balconies, balustrades, columns, cornices, cupolas, facades, pediments, railings, steeples, and watertables. FRP molded products can convincingly replicate original materials, such as cast iron, copper, limestone, terra cotta, painted wood, sandstone, and sheet metal. As with any material, the key to proper use of FRP lies in matching its physical attributes with the desired applications. For engineering and aesthetic reasons, exterior cornices have become one of the more popular building applications - in restoration, as well as in new construction. An analysis of how to specify and install an FRP cornice will provide a useful example of using FRP in building restoration. 1. EXISTING CONDITIONS SURVEY: Understanding existing conditions is critical. How was the original material attached? What is the condition of the parapet wall? If the original was cast iron, stone, or terra cotta, have steel support structures deteriorated beyond usability? Can they be reused to attach lightweight facade ornament? If the original cornice was wood or sheet metal, it was probably attached to a slanted extension of the roof, known as a "haunch." Has this haunch or the roof joists rotted out or burned beyond use? In many cases, the parapet inside or behind an old cornice was never meant to be exposed, and should be considered structurally questionable. Since the parapet must withstand significant wind, snow, seismic, and static loads, the architect or engineer must decide whether to retain an existing wall or demolish down to the roof line and rebuild a properly reinforced new parapet. Determine also the relationship of the roof line to the "scar line" (where the bottom of the old cornice meets the top of the face brick). This dimension, together with the height of the parapet, is necessary to size the new cornice. 2. IDENTIFYING CORNICES: For simplicity, cornices can be identified by location, purpose, and mounting characteristics: Haunch Mount. Many cornices on flat-roofed buildings were originally tied directly onto the outer edge of a sloped extension rising from the roof (the haunch). These sheet metal or wooden cornices were sheathed over wood framing and a low, rough brick parapet. Replacing this type of cornice requires tight sizing tolerances, since the space between the roof projection and scar line is a fixed dimension. The structural integrity of the FRP cornice units should eliminate the need for internal framing. This style may be hard to rig during installation and might require the use of several construction trades, such as Roofers and Installers. Face Mount or Parapet Wall. When haunch-type cornices fail, the entire roof extension and interior rough masonry parapet are often removed and replaced with a flat roof and new parapet built to local code requirements, e.g., 3-1/2 ft. above roof level, and topped with a masonry or sheet metal cap/coping. A wall-mounted FRP cornice is then installed below the coping. This cornice type usually includes an integral cornice "roof," pitched outward to shed water from the building. A face-mount cornice is typically attached to treated wood blocking or shelf angles, premounted horizontally (with masonry anchors or thru bolts) on the outside of the wall. As above, the cornice can be considered a self-reinforced structural unit, avoiding internal bracing, with fastening along top and bottom. Additional blocking and fastening may be needed for large profiles. Since the cornice is not part of the roofing work, it can be the last item installed, thus allowing for better construction sequencing. The cornice "roof' should be counter-flashed for better waterproofing. Frame Mount. (to follow) Parapet Cap/Cornice Combination. This cornice face and "roof" combination goes over the parapet and drains back onto the building roof. Often made as separate face and roof moldings, an internal framework is usually needed. Potential joint leaks between adjacent sections could compromise parapet wall waterproofing. Gutter and Eave Mounts. Often seen on large pitched roof buildings, cornice and rain gutter combinations were commonly made of wood, copper, or sheet metal, with concealed rain gutter of similar materials between cornice and sloped roofing. In replacement, the decorative FRP cornice would be mounted to the same outrigger framing that supports the trough. The trough could consist of standard gutter materials, such as copper, aluminum, or a rubber membrane swale. For a pitched roof without a gutter, the cornice would fasten to blocking at the outer edge of the eave, flashed into the roofing, and fastened again along the bottom edge. Externally-located gutters mounted over FRP cornices would be installed as if over a conventional cornice. Watertables. Watertables - any projecting horizontal band below the top floor - are used for decoration and for shedding water. Watertables were originally made of terra cotta, stone, cast iron, or sheet metal. Originals often must be removed due to deterioration of their support structures. Replacement FRP moldings can be wall-mounted onto treated wood blocking or onto metal angles. To avoid repeating past maintenance failures, the top of the FRP element should be set into a masonry reglet, counter-flashed and/or carefully caulked. Store Fronts. Ground-floor commercial facades traditionally incorporated sheet metal or wood decorative elements, including smaller scale renditions of the roof cornice. With the availability of colors, single-unit construction, and standard shapes, FRP is an ideal material to replicate the look of these old storefronts. Attachment can be simply done with wood blocking. Signage can often be incorporated into the "frieze" area. 3. INSTALLATION & ATTACHMENT: FRP is commonly screw-fastened into pre-installed pressure-treated wood blocking, galvanized steel studs, or structural angles made of fiberglass, aluminum, galvanized, or stainless steel. Other methods include bolting directly into (or through) a wall, screwing from behind into embedded wood, using a concealed clip system, or direct bonding using a structural adhesive. Fasteners. Strength, appearance, durability, cost, and substrate affect choice of fasteners. The good bearing-strength of FRP laminates and the shear strength of screws indicates that optimal fastening is down through tile top of a cornice and up through the bottom. Least desirable fastenings are face fastenings loaded in "pull-out" and weakened by removal of material for countersinks. The option of field-installed patches over countersunk screws relies on the installer's artistry and an absence of panel movement that would crack the patch. In the long term, intentional placement of exposed screws, and careful choice of screw spacing, style, material and color will usually be more durable, cost-effective, and attractive than a patch job. All fasteners should be either stainless, galvanized, or have a factory applied corrosion-resistant coating. Cornice "roof" fasteners should use a stainless steel-and-neoprene combination sealing-washer to spread the load and seal the hole. Blocking should be attached with masonry anchors or bolted thru wall with stainless-steel threaded rods and backing plates; Joint Details. Joint location is determined by the practical handling size of the cornice unit and/or the relationships to other aesthetically significant lines on the building. Depending on the vertical size of a molded profile, the panel length could range from 4 to 10 feet. Intentional, symmetrical, regularly spaced joints usually will look the best. "Over-lap": and "butt" joints are the two major approaches to panel-to-panel joining. In an "over-lap" joint, one mating edge has a step or joggle, with the other having a straight or field-trimmed edge. At installation, the joggle edge telescopes behind the straight one, with face fastening of one panel edge to the other, often using countersunk screws. While providing some field trim flexibility, this method doesn't properly allow for thermal movement. "Butt" joints, when made with full end walls or partial return flanges on each end, provide several useful advantages. The closed-end walls create vertical webs that make the cornice profile rigid, help control shrinkage, and insure that mating units will match. With a typical 3/8-in. joint space, the returns provide bearing surface for 1/2-in. dia. foam backer rod and elastometric sealant. Since the units are independently anchored, thermal movement can occur freely. Additionally, the closed ends create integral structural support for the cornice roof, virtually eliminating the need for internal framing and associated penetrations and face fastenings. Also, since most FRP cornices are (or should be) made with fire retardant resins, the closed ends create effective fire stops, eliminating the dangerous "cock loft" condition common to many old buildings. Joint Treatments. The reality of joints is that since they can't be made to disappear, they should look like they belong. Filling joints with color matched polyester gel coat pastes and hoping they will become invisible is ill advised. This procedure creates a brittle joint prone to cracking and leaking; and, it requires much time and artistry by field installers. Preferred are flexible, elastometric caulk joints made of polyurethane or silicone sealant, which provide reliable waterproofing and are fairly easy to install. Although sealant is available in a variety of colors, choices are somewhat limited. It is often easier and cheaper to pick a caulk color and to custom-match the color of the gel coat surface material. Joint Expansion Provisions. The coefficient of thermal expansion of FRP is 1.1 x 10 -5 in./in./deg.F, which is similar to aluminum and about twice that of steel or stone. The unit and joint design must allow for these relative movements between the FRP and adjoining materials. The minimum practical installable caulk width is 1/4 in. to 3/8. in., which comfortably allows for expansion in units of 12 ft. or less. 4. STRUCTURE: In addition to its strong mechanical properties, the layered isotropic nature of fiberglass laminate creates a structure where the geometry of the shape contributes considerable strength. Thus, molded-in brackets, curves, bends, and other ornament are structurally functional. As noted before, properly made end-return flanges create structurally significant, double vertical supports every 4 to 8 feet, depending on unit length. Introducing a core material between layers of FRP laminate substantially increases stiffness and strength with comparatively small increase in cost. This "sandwich" construction is commonly used to prevent warping and distortion in large flat surfaces. Flat "roof' areas should always use this integral reinforcement technique to support wind, snow, workmen, or other possible loads. As a good rule of thumb, sandwich-core construction should be used on any surface 12 in. x 12 in. or greater, and on any running surface of 9 in. or greater width. 5. FINISHES & TOOLING: Possible surface finishes on an FRP molding range from polished high gloss to low luster matte, from regular "combing" to rough stone texture, and are a function of the mold from which they are made. Finishes are sometimes limited more by the imagination than by the manufacturing process. The exterior surface usually consists of a polyester "gel coat," formulated to be weather- and stain-resistant, colorfast, and UV stable. Computer color matching enables virtually any color to be replicated. Sandfilled "polymer concrete" surfaces can be sandblasted to look like real stone. Tooling. Matte and glossy finishes, crisp details, large parts, and long production runs are usually produced in rigid molds made of fiberglass. Deep textures, undercuts, and on-site casts are most often produced in flexible molds made of silicone, latex, or urethane, and backed with a rigid shell. Flexible molds are limited in production life expectancy and shape retention. The ability to create and maintain these molds and the attention to detail, fit, and dimension is what differentiates one molder/ fabricator from another. Saving money on tooling is usually a painfully false economy. Usually on Landmarks and other architecturally unique buildings, the cornice and other ornamentation must be precisely replicated, often with on-site molds and templates. Sometimes, however, tooling costs can be minimized by exploring the use of standard or preexisting molds, which may be close enough in shape, size, and style to convincingly replace the original. 6. SPECIFICATIONS: Not all fiberglass laminates are the same; choice of resin and amount of materials used determines the degree of fire retardancy (up to Class 1 per ASTM E-84) and nominal wall thickness (typically 1/8 in. up to 3/16 in.). A properly worded specification benefits all parties, as do completely detailed contract drawings. Providing a "performance" specification clarifying the requirements of the job allows all fabricators to bid on the same basis. The Architectural Fiberglass Corp. Guide Specification is an example of a fabricator supplied Specification. It includes the essential features needed to describe the desired product characteristics. "Average Mechanical Properties" are realistic, achievable, conservative values usable for engineering calculations.
|